이클립스에서 프로젝트를 불러와서 사용하다 보면,,,


Unable to resolve target 'Google Inc.:Google APIs:XX'

라는 에러를 자주 보게 된다....


이거 엄첨 아주 엄청 짜증나게 된다..


이러한 경우는 해당 버전을 업데이트 하지 않나서 나타나는 경우에 이러한 에러가 나타 나게 된다...


<<해결법>>


프로젝트 마우스 오른쪽 클릭 -> Properties -> Android 


Project Target 체크를 해준다.!!!


그럼,,,, 해결~!~


'IT 공부 > 안드로이드' 카테고리의 다른 글

Failed to install on device timeout ERROR  (2) 2012.10.27
Intent 활용 예시들  (0) 2012.10.26
android service  (1) 2012.03.12
안드로이드 한글 깨짐 현상 수정법  (2) 2012.03.10
android intent 여러값넘기기  (1) 2012.03.08

과제를 다시 리팩토링 하던 도중 갑자기 생겨버린 에러 -_-;;


한참을 고민해서 수정했습니다. 


수정방법은 이와 같습니다. 이것은 디바이스에 업로드 할때 시간에 필요한데 


시간이 부족하여 생기는 에러이다. 그래서 이와 같은 방법으로 수정을 하면 된다


Preference -> Android -> DDMS 


ADB connection time out(int)의 임의의 수를 올려준다.

// 웹페이지 띄우기

Uri uri = Uri.parse("http://www.google.com");

Intent it  = new Intent(Intent.ACTION_VIEW,uri);

startActivity(it);


// 구글맵 띄우기

Uri uri = Uri.parse("geo:38.899533,-77.036476");

Intent it = new Intent(Intent.Action_VIEW,uri);

startActivity(it); 


// 구글 길찾기 띄우기

Uri uri = Uri.parse("http://maps.google.com/maps?f=d&saddr=출발지주소&daddr=도착지주소&hl=ko");

Intent it = new Intent(Intent.ACTION_VIEW,URI);

startActivity(it);


// 전화 걸기

Uri uri = Uri.parse("tel:xxxxxx");

Intent it = new Intent(Intent.ACTION_DIAL, uri);  

startActivity(it);  


Uri uri = Uri.parse("tel.xxxxxx");

Intent it = new Intent(Intent.ACTION_CALL,uri);

// 퍼미션을 잊지 마세요. <uses-permission id="android.permission.CALL_PHONE" />


// SMS/MMS 발송

Intent it = new Intent(Intent.ACTION_VIEW);   

it.putExtra("sms_body", "The SMS text");   

it.setType("vnd.android-dir/mms-sms");   

startActivity(it);  


// SMS 발송

Uri uri = Uri.parse("smsto:0800000123");   

Intent it = new Intent(Intent.ACTION_SENDTO, uri);   

it.putExtra("sms_body", "The SMS text");   

startActivity(it);  


// MMS 발송

Uri uri = Uri.parse("content://media/external/images/media/23");   

Intent it = new Intent(Intent.ACTION_SEND);   

it.putExtra("sms_body", "some text");   

it.putExtra(Intent.EXTRA_STREAM, uri);   

it.setType("image/png");   

startActivity(it); 


// 이메일 발송

Uri uri = Uri.parse("mailto:xxx@abc.com");

Intent it = new Intent(Intent.ACTION_SENDTO, uri);

startActivity(it);


Intent it = new Intent(Intent.ACTION_SEND);   

it.putExtra(Intent.EXTRA_EMAIL, "me@abc.com");   

it.putExtra(Intent.EXTRA_TEXT, "The email body text");   

it.setType("text/plain");   

startActivity(Intent.createChooser(it, "Choose Email Client"));  


Intent it = new Intent(Intent.ACTION_SEND);     

String[] tos = {"me@abc.com"};     

String[] ccs = {"you@abc.com"};     

it.putExtra(Intent.EXTRA_EMAIL, tos);     

it.putExtra(Intent.EXTRA_CC, ccs);     

it.putExtra(Intent.EXTRA_TEXT, "The email body text");     

it.putExtra(Intent.EXTRA_SUBJECT, "The email subject text");     

it.setType("message/rfc822");     

startActivity(Intent.createChooser(it, "Choose Email Client"));   


// extra 추가하기

Intent it = new Intent(Intent.ACTION_SEND);   

it.putExtra(Intent.EXTRA_SUBJECT, "The email subject text");   

it.putExtra(Intent.EXTRA_STREAM, "file:///sdcard/mysong.mp3");   

sendIntent.setType("audio/mp3");   

startActivity(Intent.createChooser(it, "Choose Email Client"));


// 미디어파일 플레이 하기

Intent it = new Intent(Intent.ACTION_VIEW);

Uri uri = Uri.parse("file:///sdcard/song.mp3");

it.setDataAndType(uri, "audio/mp3");

startActivity(it);


Uri uri = Uri.withAppendedPath(

  MediaStore.Audio.Media.INTERNAL_CONTENT_URI, "1");   

Intent it = new Intent(Intent.ACTION_VIEW, uri);   

startActivity(it);  


// 설치 어플 제거

Uri uri = Uri.fromParts("package", strPackageName, null);   

Intent it = new Intent(Intent.ACTION_DELETE, uri);   

startActivity(it);


// APK파일을 통해 제거하기

Uri uninstallUri = Uri.fromParts("package", "xxx", null);

returnIt = new Intent(Intent.ACTION_DELETE, uninstallUri);


// APK파일 설치

Uri installUri = Uri.fromParts("package", "xxx", null);

returnIt = new Intent(Intent.ACTION_PACKAGE_ADDED, installUri);


// 음악 파일 재생

Uri playUri = Uri.parse("file:///sdcard/download/everything.mp3");

returnIt = new Intent(Intent.ACTION_VIEW, playUri);


// 첨부파일을 추가하여 메일 보내기

Intent it = new Intent(Intent.ACTION_SEND);  

it.putExtra(Intent.EXTRA_SUBJECT, "The email subject text");  

it.putExtra(Intent.EXTRA_STREAM, "file:///sdcard/eoe.mp3");  

sendIntent.setType("audio/mp3");  

startActivity(Intent.createChooser(it, "Choose Email Client"));


// 마켓에서 어플리케이션 검색

Uri uri = Uri.parse("market://search?q=pname:pkg_name");  

Intent it = new Intent(Intent.ACTION_VIEW, uri);  

startActivity(it);  

// 패키지명은 어플리케이션의 전체 패키지명을 입력해야 합니다.


// 마켓 어플리케이션 상세 화면

Uri uri = Uri.parse("market://details?id=어플리케이션아이디");  

Intent it = new Intent(Intent.ACTION_VIEW, uri);  

startActivity(it);

// 아이디의 경우 마켓 퍼블리싱사이트의 어플을 선택후에 URL을 확인해보면 알 수 있습니다.


// 구글 검색

Intent intent = new Intent();

intent.setAction(Intent.ACTION_WEB_SEARCH);

intent.putExtra(SearchManager.QUERY,"searchString")

startActivity(intent);


http://theeye.pe.kr/entry/a-tip-of-android-intent-with-simple-examples

<아이군님의 블로그에서 퍼온글입니다>

알고리즘 공부도중에 창이 바로 꺼져 매일 맨 마지막 하단에 scanf를 걸어서 결과를 확인 하고했었다. 


그런데 이를 막는 방법이 있다!!


프로젝트 속성 -> 구성 속성 -> 링커 -> 시스템 -> 하위시스템 -> (/SUBSYSTEM:CONSOLE)


이와 같이 설정을 한다. 


그러면 번거로운 작업을 안하게 된다!!


오늘 큰거 하나배웠다 ㅋㅋㅋ

TCP/IP

Socket을 통해서 서버와 클라이언트가 연결하고, 통신을 합니다.


Server 순서

1. 소켓 생성

2. 연결 요청할 주소 설정

3. 소켓에 포트를 연결

4. 커널 개통에 연결

//반복

5. 클라이언트 연결 수신

6. 클라이언트 서비스 제공

7. 클라이언트 연결 종료

//반복 끝

8. 서버 종료


Client 순서

1. 클라이언트 소켓 생성

2. 연결할 서버의 주소 설정

3. 소켓을 서버와 연결

4. 서비스 요청 & 처리

5. 클라이언트 종료


1. Server Source

import java.io.BufferedReader;

import java.io.InputStream;

import java.io.InputStreamReader;

import java.io.OutputStream;

import java.io.OutputStreamWriter;

import java.io.PrintWriter;

import java.net.InetAddress;

import java.net.ServerSocket;

import java.net.Socket;


public class Server {

public static void main(String[] args) {

try {

// 서버 소켓을 열고, 포트 9000번

ServerSocket s_socket = new ServerSocket(9000);

System.out.println("Client accept!!");

// 클라이언트 대기한다.

Socket c_socket = s_socket.accept();


// 클라이언트 주소 가져온다.

InetAddress addr = c_socket.getInetAddress();

System.out.println(addr.getHostAddress() + 

"로 부터 접속했습니다.");

/*

* Stream* 문자를 보내고 받는 것을 Stream에 

넣어서 Stream데이터를 Byte배열 같은 데이터 구조로

* 전송한다.

*/

InputStream in = c_socket.getInputStream();

OutputStream out = c_socket.getOutputStream();

BufferedReader br = new BufferedReader(

new InputStreamReader(in));

PrintWriter pw = new PrintWriter(

new OutputStreamWriter(out));

// String 형식을 담아서 출력시킨다.

String message = null;

while ((message = br.readLine()) != null) {

System.out.println("client : " + message);

// OutputStream에 담아서 메세지를 보낸다.

pw.println(message);

//Stream에 대한 모든 버퍼를 지운다.

pw.flush();

}

//다 닫아준다.

br.close();

pw.close();

c_socket.close();

} catch (Exception e) {

e.printStackTrace();

}

}

}


2. Client Source

import java.io.BufferedReader;

import java.io.InputStream;

import java.io.InputStreamReader;

import java.io.OutputStream;

import java.io.OutputStreamWriter;

import java.io.PrintWriter;

import java.net.Socket;


public class Client {

public static void main(String arg[]){

try{

//자신의 소켓을 연다.

Socket socket=new Socket("210.118.69.56",9000);

//입력을 버퍼에 넣는다.

BufferedReader kb=new BufferedReader(

new InputStreamReader(System.in));

/*

* Stream* 문자를 보내고 받는 것을 Stream에 넣어서

 Stream데이터를 Byte배열 같은 데이터 구조로

* 전송한다.

*/

InputStream in=socket.getInputStream();

OutputStream out= socket.getOutputStream();

BufferedReader br=new BufferedReader(

new InputStreamReader(in));

PrintWriter pw=new PrintWriter(

new OutputStreamWriter(out));

String message=null;

//입력받은 것이 null이 아니면!

while((message=kb.readLine())!=null){

if(message.equals("exit"))

break;

//메세지를 보낸다.

pw.println(message);

//Stream에 대한 모든 버퍼를 지운다.

pw.flush();

String echoMessage=br.readLine();

System.out.println("Server : "+echoMessage);

}

br.close();

pw.close();

socket.close();

}catch(Exception e){

e.printStackTrace();

}

}

}


이클립스와 톰켓은 모두 다운로드 후 설치 하셨지요?

아직 하지 않으셨거나 기억이 나지 않으신다면
아래 링크를 참조하세요.


이제는 효율적인 개발을 위한
이클립스와 톰켓의 연동방법 입니다.

가장 먼저 서버 실행 환경을 설정해야 합니다.

서버 실행 환경 설정


이클립스 메뉴에서 환경설정으로 들어갑니다.


왼쪽탭의 Server 에서 runtime Environment 메뉴를 선택하여
Add 버튼을 선택합니다.


그런 뒤 다운로드 받은 톰켓 6.0 을 선택한 뒤 다음으로 .


설치된 디렉토리를 선택해야 되므로 선택을 누릅니다.


이전, 톰켓 설치 폴더를 지정해 준 뒤 Finish 를 합니다.


자 그럼 이제 설정이 완료되었답니다~ㅎ

바로 테스트하로 가볼까요?


테스트 하기.


테스트를 하기 위하여 우선 프로젝트를 하나 추가해 줍니다.


프로젝트가 만들어 졌다면은,
프로젝트 내에 있는

WebContent 폴더에서 마우스 오른쪽 -> JSP 페이지를 만듭니다.


그러면 이제 새로운 JSP 페이지가 아래처럼 만들어 집니다.


그럼 이제 테스트를 위하여 적당한 텍스트를 입력한 후 실행해 보도록 하죠

단축키 : Ctrl + F11 을 선택합니다.


정상 출력이 될것입니다.!!!

<http://underclub.tistory.com/160> 

'IT 공부 > JSP' 카테고리의 다른 글

JSP TOMCAT 설치(시작)  (0) 2012.03.19

 JSP를 사용하기 위해서는 반드시 웹 컨테이너가 필요합니다.

대부분의 웹 컨테이너에는 웹 서버 기능을 가지고 있습니다. 물론 웹 서버용으로 별도로 제공되는 것들에 비해서 아주 기본적인 기능만 제공하지만, 상업용으로 JSP를 서비스할 목적이라면 웹 컨터이너 이외에 웹 서버를 따로 설치해야 합니다.

또한 여기에 웹 어플리케이션 서버도 따로 설치해야 됩니다.


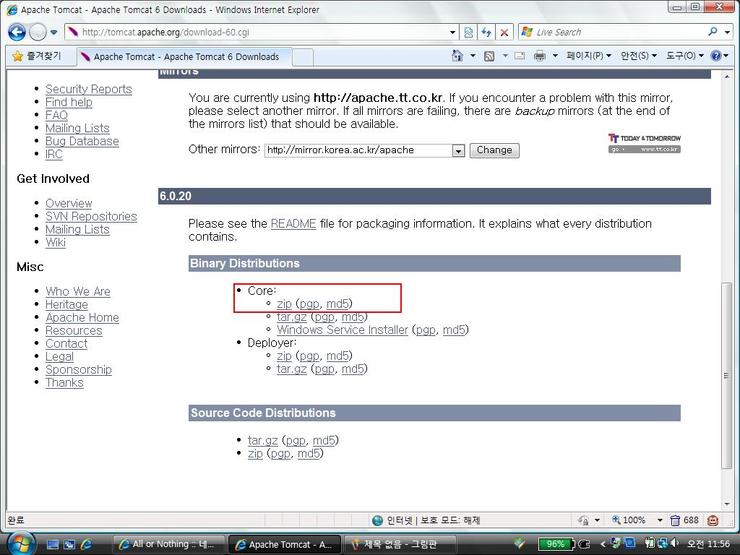
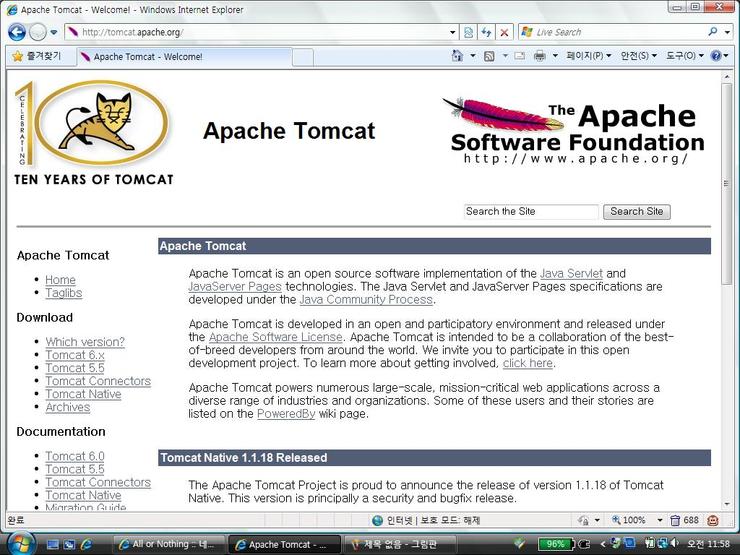
톰캣(Tomcat) 사이트에 접속합니다.
http://tomcat.apache.org


 왼쪽 메뉴에 Download <Tomcat 6.x>를 클릭합니다.


Binary Distributions 밑에  Core: Zip을 클릭하여 압축파일을 다운로드 받습니다.


[내 컴퓨터] - [속성] - [고급 탭] - [환경변수] - [시스템 변수 새로만들기]에서 아래와 같이

변수 이름과 변수 값을 입력합니다.


*** 변수 값에는 톰켓 폴더가 위치한 경로를 확인 해주세요 ***


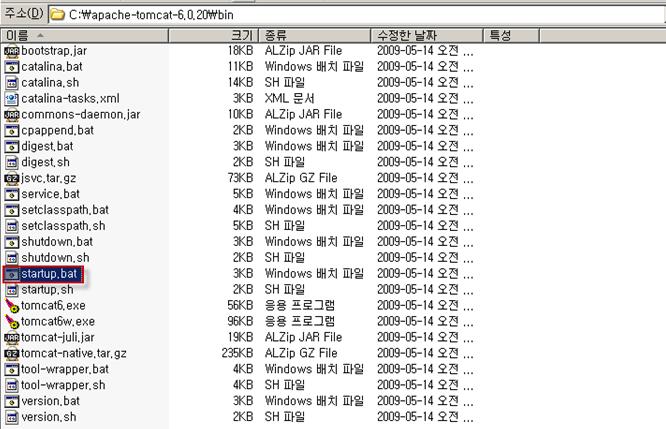
설치된 톰켓 폴더 안에 bin 폴더에 들어갑니다.

startup 파일 또는 startup.bat 파일을 실행 합니다.


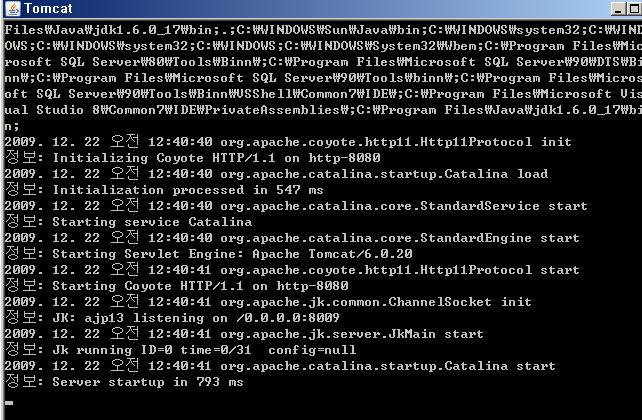
startup 파일 또는 startup.bat 파일을 실행이 된 모습입니다.


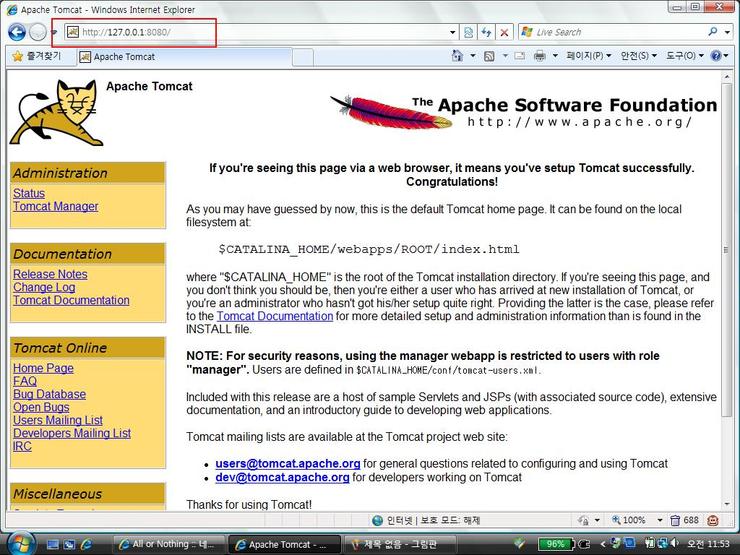
마지막으로  인터넷 창을 열고   " http://127.0.0.1:8080 "을 입력했을때 다음과 같은 창이 나온다면 톰켓 설치는 끝난 것입니다.


[174  javajni.c] [error] 지정된 모듈을 찾을 수 없습니다. 
[947  prunsrv.c] [error] Failed creating java C:\Sun\SDK\jdk\jre\bin\server\jvm.dll

[1202 prunsrv.c] [error] ServiceStart returned 1


만약 다음과 같은 에러가 발생한 경우에는 Windows의 system32 안에 JVM이 설치된 폴더에서 msvcr71.dll 파일을 찾아 복사해서

넣어두면 됩니다.

http://blog.naver.com/ssuyastory?Redirect=Log&logNo=100096350007 > 


'IT 공부 > JSP' 카테고리의 다른 글

TOMCAT & Eclipse 연동시키기!(연결)  (3) 2012.03.19

Service는 background에서 처리를 계속할 수 있는 클래스이다.
Service는 기본적으로 activity를 가지지 않는다.

서비스를 구현하기 위한 3가지 절차
-- Service 클래스를 확장한 새로운 클래스 정의
-- Manifest file에 Service 선언 추가
-- App에서 Service 실행


1. 서비스를 실행하는 클래스 - 타이머를 이용한 반복 처리.


public class MyService extends Service implements Runnable {

    // 시작 ID
    private int mStartId;
    // 서비스에 대한 스레드에 연결된 Handler. 타이머 이용한 반복 처리시 사용.
    private Handler mHandler;
    // 서비스 동작여부 flag
    private boolean mRunning;
    // 타이머 설정 (2초)
    private static final int TIMER_PERIOD = 2 * 1000; 
    private static final int COUNT = 10;
    private int mCounter;


    // 서비스를 생성할 때 호출
    public void onCreate() {
        Log.e("MyService", "Service Created.");
        super.onCreate();
        mHandler = new Handler();
        mRunning = false;
    }


    // 서비스 시작할 때 호출. background에서의 처리가 시작됨.
    // startId : 서비스 시작요구 id. stopSelf에서 종료할 때 사용. 

     //onStart는 여러번 호출될 수 있기 때문에 식별자로 사용.

    public void onStart(Intent intent, int startId) {
        Log.e("MyService", "Service startId = " + startId);
        super.onStart(intent, startId);
        mStartId = startId;
        mCounter = COUNT;

        // 동작중이 아니면 run 메소드를 일정 시간 후에 시작
        if (!mRunning) {
              // this : 서비스 처리의 본체인 run 메소드. Runnable 인터페이스를 구현 필요.
              // postDelayed : 일정시간마다 메소드 호출
              mHandler.postDelayed(this, TIMER_PERIOD);
              mRunning = true;
        }
    }


    // 서비스의 종료시 호출
    public void onDestroy() {
        // onDestroy가 호출되어 서비스가 종료되어도
        // postDelayed는 바로 정지되지 않고 다음 번 run 메소드를 호출.
        mRunning = false;
        super.onDestroy();
    }


    // 서비스 처리
    public void run() {
        if (!mRunning) {
            // 서비스 종료 요청이 들어온 경우 그냥 종료
            Log.e("MyService", "run after destory");
            return;
        } else if (--mCounter <= 0) {
            // 지정한 횟수 실행하면 스스로 종료
            Log.e("MyService", "stop Service id = "+mStartId);
            stopSelf(mStartId);
        } else {
            // 다음 작업을 다시 요구
            Log.e("MyService", "mCounter : " + mCounter);
            mHandler.postDelayed(this, TIMER_PERIOD);
        }
    }

    // 원격 메소드 호출을 위해 사용
    // 메서드 호출을 제공하지 않으면 null을 반환
    public IBinder onBind(Intent intent) {
        return null;
    }
}


2. 서비스 실행, 종료를 사용자가 요청하는 클래스


// 서비스 시작과 종료를 요구하는 Activity
public class MyServiceActivity extends Activity {

    ComponentName mService;    // 시작 서비스의 이름
    TextView mTextView;              // 서비스 상태 표시


    public void onCreate(Bundle savedInstanceState) {
        super.onCreate(savedInstanceState);
        setContentView(R.layout.main);
       
        mTextView = (TextView)findViewById(R.id.text_view);
       
        Button start = (Button)findViewById(R.id.start_button);
        start.setOnClickListener(new View.OnClickListener(){
            public void onClick(View v) {
                startHelloService();
            }});
       
        Button stop = (Button)findViewById(R.id.stop_button);
        stop.setOnClickListener(new View.OnClickListener(){
            public void onClick(View v) {
                stopHelloService();
            }});
    }


    // 서비스 시작 요청
    private void startHelloService() {
        mService = startService(new Intent(this, MyService.class));
        mTextView.append(mService.toShortString()+" started.\n");
    }


    // 실행한 서비스 중지 요청

    private void stopHelloService() {
        if (mService == null) {
            mTextView.append("No requested service.\n");
            return;
        }
       
        Intent i = new Intent();
        i.setComponent(mService);
        if (stopService(i))
            mTextView.append(mService.toShortString()+" is stopped.\n");
        else
            mTextView.append(mService.toShortString()+" is alrady stopped.\n");
    }
}


<service android:enabled="true" android:name=".MyServic"></service>

'IT 공부 > 안드로이드' 카테고리의 다른 글

Failed to install on device timeout ERROR  (2) 2012.10.27
Intent 활용 예시들  (0) 2012.10.26
안드로이드 한글 깨짐 현상 수정법  (2) 2012.03.10
android intent 여러값넘기기  (1) 2012.03.08
android animation 반복  (1) 2012.03.05


안드로이드 개발하다보면 import해서 쓰는 경우가 허다한데

이때 파일을 불러왔을때 이상한 단어로 깨져서 오게 된다

이때 수정법을 말하면,,

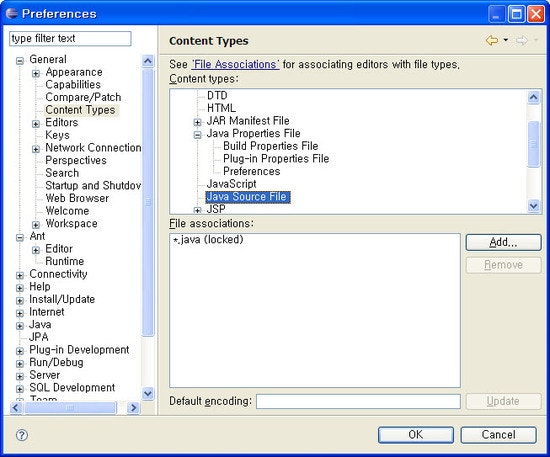
Window → Preferences → 왼쪽 메뉴 General → Content Types


Java Source File 혹은 한글 깨짐과 관련된 항목을 선택하시고 

Default encoding: euc-kr 로 바꿔서 한번 해보세요


'IT 공부 > 수업자료' 카테고리의 다른 글

소프트웨어공학설계 수업자료입니다.  (4) 2012.03.08

+ Recent posts